Sunday, May 2, 2010

A Tale of Two Nights

It's always fun to try something new. Varina did a bit of night photography years ago - but neither of us has spent much time shooting in the dark in recent years. In the past several months, we spent some time shooting at night in Arizona and New Mexico. Here are a few of our attempts. What do you think?

This shot, titled "The Night Flight", is a digital blend of two images taken during our recent trip to Bisti Wilderness in New Mexico. The image was created using a technique Jay calls "Painting with Time", and no artificial lighting was used. He took one shot just as the last light was falling on the hoodoo - soft, directional lighting gives the formation a soft, golden glow. After taking the first shot, Jay left the camera and the tripod in place. Soon, the stars came out, and he adjusted the exposure to capture their light. (F5.6@25s, ISO 500). Later, he combined the images in Photoshop to create the final image you see above.
 Varina chose a simpler technique that evening at Bisti. Shortly after sunset, she used a 3.2 second shutter speed to capture these smooth hoodoos. The sky glowed with a soft magenta light in the West, and the reflected light created the slight color cast you see in the image.
We also tried some night photography in the Vermilion Cliffs in Arizona. Jay's shot is titled "A Night at The Control Tower". This is an example of light panting. Although we generally prefer natural lighting, we find that a bit of artificial light can work well alongside ambient light. In this case, the ambient light was provided by the moon. Jay used a 30 second exposure (F4, ISO 200) to underexpose the scene by about 1.3 stops. He wanted to avoid a longer shutter speed, since it would result in "star trails". He used a headlamp to light The Control Tower as he waited. Matching the exposure for the foreground and the background required some experimentation.
While Jay was busy painting with light, Varina climbed high on the rocks in the dark to find a spot that offered an interesting view from above. She wanted to capture the glow of residual light on the bizarre Southwest landscape. In order to capture enough light, she used a whopping 266 second shutter speed (F16, ISO 100). (Though she could have reduced that long shutter speed by increasing the ISO.) The rich colors in the rock were enhanced by the very faint glow in the western sky.

Light Painting, "Painting with Time", star light, moon light, residual light... your options are wide open! Have you tried shooting after dark? If you have some night shots you'd like to share, leave a link in your comment. Make sure you tell us how you did it!

Labels: , , ,

Monday, December 7, 2009

Part 3 - Capturing Vibrant Colors

...continued from Capturing Vibrant Colors - Part 2...

The "Golden hours" are the moments right after sunrise and before sunset, when warm sunlight paints the landscape in rich magenta or gold tones. When the sun is low in the sky, soft, filtered sunlight makes it easier to get your exposure right in-camera - so capturing vibrant color is easier as well. Jay captured the golden light in this image of a young alligator just as the sun dipped below the horizon.
Dynamic weather conditions can serve to further enhance brilliant light during the golden hour. Stunning color from storm clouds may also provide reflections in water and on the ground. The warm light in the photo below comes from passing storm clouds - notice the fantastic light on the distant mountains.
After you have captured a photo, you'll need to process your photo. Be careful to choose the best possible white balance so that your colors are accurately portrayed and looking their best. Take a look at the two images below. Varina's shot from Yellowstone looks odd when it is processed using default white balance settings. The image has an unnatural blueish cast both on the ground and in the sky.
When the same photograph is processed using a "daylight" white balance (5500 K), the blue cast disappears. The colors in the photo look clean and natural, and the photograph seems much more inviting.
Tips for Capturing Vibrant Colors
  • Shoot during the "Golden Hours"
  • Look for dynamic weather conditions
  • Choose the appropriate white balance when processing (or in-camera if you are not yet using processing software)

Labels: , ,

Friday, December 4, 2009

Gestalt - Proximity Principle

Previous posts on this subject:
Gestalt Figure/Ground Articulation
Similarity Principle

The proximity principle states that objects which are closer together will be seen as belonging together. Take a look at the picture below:Most people will perceive two groups of shapes, rather than sixteen individual circles. We can see the individual shapes, of course, but our brains process them as two distinct groups. The principle holds true even when the shapes in the group have nothing in common with one another. The unrelated shapes in the picture below seem to be divided into two groups - simply because of their placement within the frame.
The gestalt principle points out the fact that we tend to perceive separate shapes as a unified whole because of their proximity to one another.

So - the principle is simple enough... but what about photography? How does the proximity principle apply to the composition of a photograph?

Take a look at this shot from Paria Canyon in Arizona.
Hundreds of small patches of mud make up the foreground shape you see here... and yet we are not overwhelmed by the complexity of the photo. In fact, the image feels quite simple. It seems to contain just two elements - the interesting foreground pattern of patched mud, and the unusual "windowed" walls of the canyon. Our brains group the individual elements into groups. In this case, the proximity principle is working hand-in-hand with the similarity principle I wrote about in an earlier post.

Here's another example of the proximity principle at work:
In this case, the two main elements of the piece (aside from the water and sky) share an obvious relationship - they are both rocks. However, because they are at a substantial distance from one another, they appear as two separate entities within the image. Here, it is the lack of proximity that separates them in our mind. Of course, that physical separation is amplified by the obvious lack of similarity as well. So in this case, the principles of similarity and proximity are working in reverse.

Now, take a look at the water in this shot. It is made up of silky lines of light and shadow... but we tend to perceive it as a single element in the image. Why? The water seems to create a continuous sheet because the water in the foreground is visually similar to the water in the distance. The similarity principle is at work here - and because there is no separation between foreground and distance, the proximity principle is in effect as well.

Photographers and other artists use these principles all the time - usually without even realizing they are doing it. Some artists have a hard time visualizing a 3-dimensional scene as a 2-dimensional image, and understanding gestalt principles like these can be helpful.

Labels: , , , , , ,

Wednesday, November 18, 2009

Part 2: Capturing Vibrant Colors

...continued from Capturing Vibrant Colors - Part 1...

When you want to capture vibrant colors, consider the season and the location. Shooting outdoors in the Northeast in the middle of winter might produce a relatively colorless image - overcast skies and leafless trees leave the landscape barren. But that doesn't mean there's nothing to shoot! Far from it! An opening in the clouds near the horizon might let the sun peak through, so be ready for pretty sunsets even in the dead of winter! This shot from Lake Erie's shore shows a vibrant sky and soft, reflected color on the ice in the foreground.
When the landscape seems lifeless, look for elements that stand out. A single bright leaf left over from Autumn's glory days adds a touch of warmth to this chilly shot. If you are in the mood for color, look for bright berries, frosted leaves, and interesting skies this time of year.
Autumn is, of course, the most colorful time of year. Jay took this shot in Colorado's beautiful Snowmass Wilderness when fall colors were at their peak. He used reflections on the lake to fill the frame with reflected color from the trees and clouds.
Knowledge of a location is also useful when you are looking for brilliant color. We scout as much as possible when we're traveling, so that we can get to know the geology and topography of a region. We came upon this location while hiking in the Paria River. Jay composed a brilliantly colored photograph with striped canyon walls and cracked mud in the foreground.
Paria Canyon is equally beautiful in the winter, when the clean, white ice contrasts beautifully with the colorful canyon walls. Notice that the color varies with the direction of light, moisture, and location within the canyon.
continued on Part 3: Capturing Vibrant Colors

Tips for Capturing Vibrant Colors
  • Look for brightly colored elements that stand out against barren landscapes
  • Consider the season - and return at different time of the year
  • Look for unique geology

Labels: , ,

Sunday, November 15, 2009

Gestalt - Similarity Principle

At the beginning of November, I wrote a bit about Gestalt Figure/Ground Articulation. If you haven't read that post, you might want to start there. :)

...How can we apply a basic understanding of perception to composition in photography?...

Let's take one principle at a time. The Similarity Principle states that we tend to see things with similar visual characteristics as belonging together. The image below illustrates the point...

Do you see a triangle in the image, above? Almost all of us do. And yet - there isn't one. The figure is entirely made up of circles and squares. Our minds do the rest. We see the individual elements as two separate parts - (remember "figure" and "ground" from my first post on gestalt?) - and that happens because of the similarity principle. The circles become one group, and the squares become a second group. Our brains process this collection of shapes as two distinct groups.

So, how does this apply to composition in photography? Take a look at the image below. Can you see the similarity principle at work?

The lines in the sandstone are similar to one another, so our eyes see them as part of a whole. Rather than individual elements, they become an interesting "ground" - a single element. And the leaf? It is dissimilar... and so it is not associated with the diagonal lines. It becomes "figure" because it is different.

How about something a bit more complex?

This shot is made up of thousands of individual elements. Each tiny flower, every blade of grass... countless trees in the distance... And yet, our brains are not overwhelmed. We process the image in groups made up of similar elements. The bright red flowers become a single group. The blues blend together - and though we distinguish between mountains, storm clouds, and hazy distance, the elements are perceived as one.

In this case, the image is broken into two parts - foreground and distance. And each of these two parts is broken down once more - into figure and ground. The sunbeams and the flowers are "figure", and the blue and green areas are "ground". The image is so much simpler when we break it down in this way!

Of course, most of us never take the time to consider this when we're looking at a photograph - and yet, our brains are constantly grouping and categorizing in this way.

More on gestalt principles another day! :)

Go to Gestalt - Proximity Principle

Labels: , , , , ,

Friday, November 13, 2009

Part 1: Capturing Vibrant Colors

It is a common misconception that the vibrant colors you see in a photograph are captured using a special film (like Velvia), or are the result of special processing techniques. While it is true that film choice and post-processing can effect the colors, the art of capturing vibrant colors starts in the field. In this two-part article, we will explore how to create images with vibrant colors.

The circular polarizer is a very commonly-used filter for enhancing colors in a photograph. Circular polarizers cut through glare created by scattered light, and bring out the rich and vibrant colors in an image. This filter is particularly effective when you want to bring out the colors on a wet surface - like the beach in the photo below. Jay used a circular polarizer to reduce the sun's glare on the water, and to bring out the stunning colors at Dry Tortugas National Park in Florida.

Another factor to consider when shooting intense colors is exposure. An over or underexposed image will show dull colors and low contrast. The color in a properly exposed image will be rich and vibrant. Because landscape photographers deal with uneven lighting over large areas, they often end up with images that are overexposed in some areas and perfectly exposed in others. Varina's photograph (below) shows over exposure in the sky - and the resulting low contrast and dull colors.
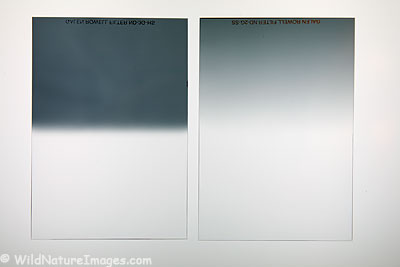
In order to fix the problem, she used a Graduated Neutral Density (GND) filter to reduce the brightness of the sky. (We often use our iHDR technique to accomplish the same purpose.) The exposure is now balanced between the sky and the ground, and the rich, vibrant colors in the sky have returned.
Another simple but effective way to enhance colors in a photograph is to use reflections. Reflected light - like you see in Jay's photo below - can fill the image with colors. The reflected colors become an important compositional element... and they are especially appealing next to the colors in the sky.

continued on Part 2: Capturing Vibrant Colors

Tips for Capturing Vibrant Colors
  • Select the proper exposure
  • Use reflections to add color to your composition
  • Use a circular polarizer to cut through glare and enhance colors

Labels: , ,

Monday, November 2, 2009

Gestalt - Figure/Ground Articulation

A pleasing composition begins with an understanding of how we see - and that leads us to the gestalt theories of perception. Gestalt - which is a German word literally meaning shape or form - is defined by Miraiam Webster as "a structure, configuration, or pattern of physical, biological, or psychological phenomena so integrated as to constitute a functional unit with properties not derivable by summation of its parts." But what does that mean, exactly?

The whole is more than the sum of it's parts. An image is made up of individual elements - shapes, lines, colors, textures, etc. As the photographer, we can change the elements within an image - their placement, color, relative size, softness, and so on.

So - let's start with the most basic premise of Gestalt. Figure/Ground articulation simply states that we generally perceive our visual field as being divided into two parts - Figure and Ground.


Take a look at the figure above. The small green object seems more important than the larger blue figure. In this case, because it is smaller, and seems to be on top , the green shape has become "figure", while the blue shape has become "ground". In photography, the goal is often to separate figure from ground using compositional elements. Here's an example...


Here - the small, light colored circles are perceived as "figure", while the orange sandstone becomes ground. The distinct color and shape of these elements separate them in our minds.


The unusual ridged stone in the foreground becomes "figure" in the image above, while sky and rock become "ground". And in the image below, the beams of light are clearly "figure", even though some of the overlapping walls of the slot canyon are closer to the camera.


So - why do our brains separate elements in this way? How can we begin to understand why we see things the way we do? And how can we apply a basic understanding of perception to composition in photography?

I'll talk about this more in future posts. :) Stay tuned!

More gestalt:
Similarity Principle
Proximity Principle

Labels: , , , ,

Tuesday, October 27, 2009

Photographing Fall Colors

Fall colors are spectacular right now. This past weekend we were able to spend some time shooting close to home.

This image taken from top of Brandywine Falls in Cuyahoga National Park. We arrived just before sunrise, and Varina used a wide angle lens to capture the color in the sky before it faded. She bracketed the shot in order to capture the entire dynamic range, and then used our manual iHDR technique to combine three images.


Overcast skies are common this time of year, and they provide soft, even lighting - which is ideal for back-lighting fall leaves. Soft directional lighting lets the leaves glow without leaving them overexposed. Jay took this photograph off-trail at Liberty Park.


While enjoying the fall colors, don't forget to notice the small details. Jay took this shot of water droplets on a leaf early in the morning. He used a translucent silk scarf to diffuse the light and prevent harsh shadows and highlights.


We try to make the most of reflections at any time of year, but in the fall, they can be particularly beautiful. In this photograph from last year, Jay used the calm waters of Maroon Lake in Colorado to capture the reflection of the fall colors on the mountains. Jay choose NOT to use his circular polarizer filter because it would have minimized the reflections of the mountains and clouds.


And finally, make the most of Autumn's stormy weather. Passing storms can mean great light. When the clouds open up, make sure you are ready to capture incredible fall color juxtaposed beside dramatic skies!


Tips for Photographing Falls Colors
  • Fall colors are easiest to photograph under a thin, even cloud cover. This provides soft overcast light that helps balance out the highlight and shadows.
  • Don't forget to notice the details - pay attention to water droplets on leaves, and the texture of bark on the trees.
  • Use a circular polarizer to reduce scattered light and enhance Fall colors. This is especially effective when you are photographing wet leaves.
  • When necessary, use a GND filter to balance the light. This will bring out the details in every part of the image.
  • Look for reflections to enhance the colors of the fall images. Don't use a circular polarizer when you are trying to capture reflections.

Labels: , , ,

Monday, October 26, 2009

When Oppourtunity Knocks...

...be ready to answer the call. In nature photography opportunity doesn't always knock at the most convenient time, or in the best location. On more then one occasion, we've found ourselves under perfect skies while in the car between destinations... or as we were hiking towards a spectacular photographic icon... or when we have six kids in the back seat. When the skies are right, we try to take advantage of the opportunity, no matter where we are. And we're usually pretty glad we did.

As we were hiking towards Horseshoe Bend in Arizona, the storm clouds opened up, and beams of soft light lit the entire area. Rather then continuing down the trail to Horseshoe bend (and risking a missed opportunity) we set up our cameras trail-side to capture the partially diffused light. We made it to Horseshoe Bend a few minutes later, but we captured the best light on the way.

While hiking through Norris Geyser Basin in Yellowstone National Park, we were surprised by a fast moving storm. As we were running towards a shelter, we noticed the blue glow of Pearl Spring with dark storm clouds hanging in the background. Jay set up his tripod and captured a single shot before running to catch up with Varina and the kids... who reached the shelter just moments before it started hailing.

On the last day of a trip to Utah, heavy clouds obscured the sky. We were en route to the airport, when the cloud cover began to open up... so we changed our course. Rather than heading directly for Salt Lake City, we pulled out the map and headed towards the beautiful clouds. We stopped on the side of the road to capture a few photos before the clouds closed in once again. In the end, we caught our flight with time to spare - and got some unexpected photographs as well.

When you are shooting outdoors, you never know when opportunity will come knocking...but when it does, we hope you'll be ready to answer with camera in hand.

Labels: , , ,

Monday, October 12, 2009

Beam Me Up, Scotty!

Dramatic sunbeams like those in the photographs you see here, occur only under certain conditions. Sunbeams appear when sunlight passes through - and is scattered by - particles in the air. In order to effectively photograph sunbeams, we need to capture them against a dark background... like heavy storm clouds. The difference between dark and light makes the sunbeams stand out.

In this shot from Glacier National Park, the sunlight scattered as it passed through particles of water vapor in the air. The dark valley provided an excellent backdrop, allowing the sunbeams to stand out. Heavy, humid air is a perfect medium for sunbeams - and because it was late in the day, the light took on a golden tone.

This photograph was taken in Arizona's spectacular Antelope Canyon. The air is very dry here in the desert, so these is little moisture to create water vapor in the air. However, the floor of the canyon is covered with fine sand. We tossed handfuls of the sand into the air, and photographed the resulting sunbeams against the dark walls of the slot canyon.

Labels: , , , ,

Wednesday, March 26, 2008

From the Bottom

It's been one of those days. The car broke down, the dishwasher flooded, the kids were... well... actually, the kids were really good. So never mind. It wasn't that bad. Still. I'm tired. Too tired to process any images. But, I have one I haven't posted yet. This is Havasu Falls from the bottom.

This shot was more complicated to process than some of the others. First, there's the sky. The horizon, here, is not straight, so using a Graduated Neutral Density (GND) filter doesn't help me. A GND - for those of you who don't know - is a (usually) rectangular sheet of plastic that fits neatly into an adapter in front of your lens. The top half of the filter is darker than the bottom half - so less light can enter the lens from the top than the bottom.

These filters are perfect for sunset or sunrise shots - where the sky is bright and the ground is dark... and the filter can slide up or down to allow the photographer to adjust for the position of the horizon. Different GND filters are useful for different situation - soft, hard, 1 stop, 3 stop... etc. I won't go into that too deeply for fear of boring everyone. Suffice it to say that these are incredibly useful little buggers if you enjoy landscape photography.

In this Havasu Falls photograph, the line between sky and ground isn't straight. So, a GND will make a dark line across the tops of the mountains - which is not the look I'm going for. Instead, I took three photographs of the same spot - using a remote release for my camera. The first shot was exposed correctly for the sky - so the sky looked great, but the ground was way too dark. The second shot was exposed correctly for the ground - which meant the sky was blown completely. And the third shot was in between the others.

I used Photoshop - my digital darkroom - to combine these three images and create a final photograph that looks as much like the real location as possible. It's a complicated process, and very time consuming - but I like the results. The image looks like the real location, so I think I've accomplished my purpose here.

You guys will have to tell me how much detail you want from my posts. Some people don't care about technical details, and others are hungry for them. So - if you have questions about GND filter - or anything else, please don't hesitate to comment on this post and ask. I'll see if I can answer your questions. And if I don't know the answer, I'll see if I can find out. That's how I learn. :)

Labels: , , ,